Configuring Monitored Repositories
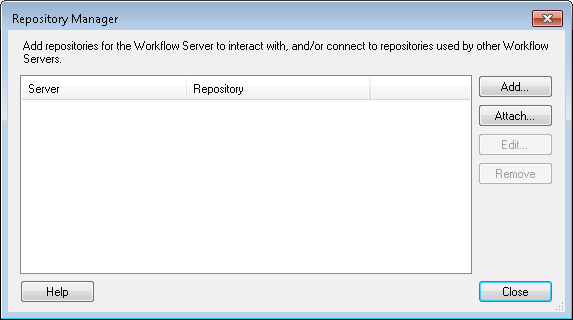
Note: If the repository is already connected to another Workflow Server, use the Attach button. More information.
Note: When you configure your monitored repositories, Laserfiche trustee directories for those repositories will be automatically added to the Trustee Directory Manager.
To add a repository to be monitored
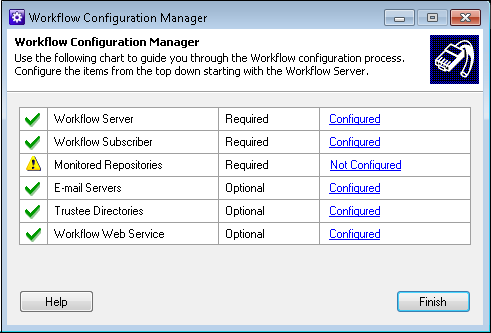
- Open the Workflow Configuration Manager under Start, All Programs, Laserfiche, Workflow. Click
 Not Configured next to Monitored Repositories. Alternatively, in the Workflow Administration Console, expand the Server Configuration node. Select the Repositories node, and click Properties in the Actions Pane,
or right-click and select Properties.
Not Configured next to Monitored Repositories. Alternatively, in the Workflow Administration Console, expand the Server Configuration node. Select the Repositories node, and click Properties in the Actions Pane,
or right-click and select Properties.
Note: In the Workflow Configuration Manager, if the link next to Monitored Repositories says Needs Prerequisite, you must first configure a Workflow Server before configuring monitored repositories.
Note: Users must have the Modify Settings permission in order to add, delete, or modify monitored repositories.
- In the Repository Manager dialog box, click Add.
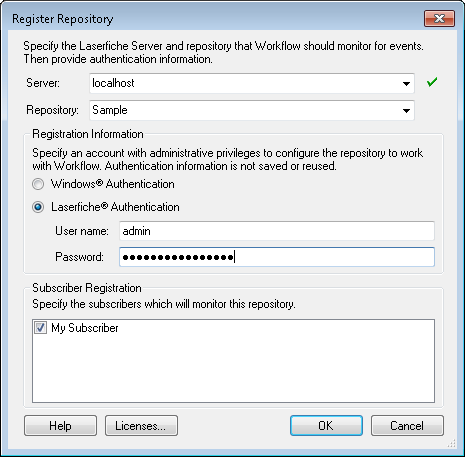
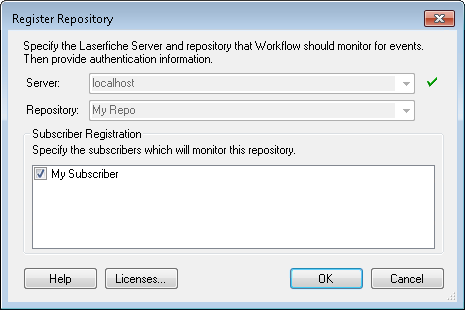
- In the Register Repository dialog box, next to Server, type or select the Laserfiche Server that Workflow should monitor for events.
- Next to Repository, type or select the repository that Workflow should monitor for events.
- Under Registration Information, specify an account with administrative privileges to configure the repository to work with Workflow. Select Use Windows Authentication if the currently logged in Windows user has the appropriate administrative privileges in Laserfiche.
- Under Subscriber Registration, select the subscriber(s) that will monitor your repository.
- Optional: If you are using a Team or United Laserfiche Server, you will need a Workflow Server license that matches the serial in the Laserfiche Server license. If you are using Laserfiche Avante or Laserfiche Rio, you do not need a license for the Workflow Server. Click the Licenses button to add a Workflow License. More information.
- Click OK.
To connect to a repository monitored by another Workflow Server
- Open the Workflow Configuration Manager under Start, All Programs, Laserfiche, Workflow. Click Not Configured or Needs Prerequisite next to Monitored Repositories. Alternatively, in the Workflow Administration Console, expand the Server Configuration node. Select the Repositories node, and click Properties in the Actions Pane,
or right-click and select Properties.
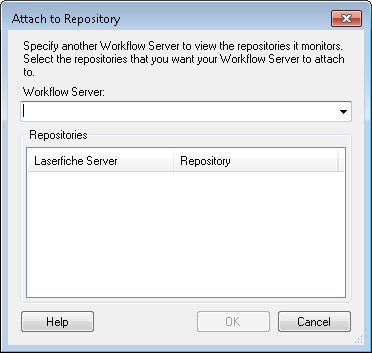
- In the Repository Manager dialog box, click Attach.
- In the Attach to Repository dialog box, type or select the Workflow Server that is currently monitoring the repository you want to connect to and monitor as well.
- The repositories monitored by the Workflow Server you selected will appear under Repositories. Select the repository you want to connect to.
- Click OK.
- In the Register Repository dialog box, select the subscribers that will monitor the selected repository.
- Optional: Click Licenses to configure license information. More information.
- Click OK.
- Click Close in the Repository Manager dialog box.
Note: Users must have the Modify Settings permission in order to view, add, delete, or modify monitored repositories.
Note: Users must have the Modify Settings permission for both the Workflow Server they are attaching from and to, before they can view, add, delete, or modify monitored repositories. This permission is set in the Permissions and Rights node of the Workflow Administration Console.
Note: You can change or remove repositories you have added or attached by selecting them in the Repository Manager and clicking either Edit or Remove.